Coupled services, tangled endpoints and pooling mechanisms are usually the result of an organically growth architecture. Unfortunately, as the scale increases, the complexity and constraints do as well.
The purpose of this talk is to expose how quickly complexity grows, and how a unified event driven architecture approach, enables the support of more complex infrastructures that require to be flexible and scalable. Additionally, it covers best practices, pros and cons; and how I have used this approach at Netflix to drive a platform that leverages more than 300 million events a day.
This talks aims to target mid to advanced level engineers who have experienced problem scaling services or dealing with complex architectures. The expectation is that after this talk, everyone walks away understanding the power of events, and how they can be leveraged to design architectures for large scale problems.
I got the pleasure of being invited to be part of one of the Path to Principal Podcast episodes. Click here to listen to my interview.
Usually, we tend to represent objects status with boolean attributes. At first, this seems right and simple enough, but as the code base evolves and gets bigger, status become complex; so do the transitions between them. Transition between status can be seen as behaviors or actions. Therefore, we find ourselves implementing rules to enforce behaviors and validating transitions; or even worse, not enforcing or validating anything at all. Considering using a state machine to represent the status of an object may be ideal. As each state on the machine can represent an object status, the transitions between states can represent well defined actions or behaviors that can be performed between status.
This talk focuses on how to identify when booleans are not the right type to represent status, and how using a state machine may lead you to a better and cleaner design that can enforce conditions between status by simply relying on the definition of a state machine.
Here you can find my slides for this presentation.
This post summarizes what I’ve learned about setting up a MongoDB Replica Set. For this tutorial I’m using Vagrant to create the instances but you can use the information explained here and adapt it for actual machines.
VMs Setup
Since we are going to set up a replica set with 3 members, the first thing we have to do is create the VMs, one for each member.
# Create a directory for each VM.
mkdir -p mongo01
mkdir -p mongo02
mkdir -p mongo03

# Create the Vagrant files.
vagrant init hashicorp/precise64 --output mongo01/Vagrantfile
vagrant init hashicorp/precise64 --output mongo02/Vagrantfile
vagrant init hashicorp/precise64 --output mongo03/Vagrantfile
After executing the code above we end up with 3 Vagrant environments, one in each directory. Next, edit each Vagrantfile. Set the value of config.vm.hostname and config.vm.network :private_network, ip.
# The IPs and the names are up to you.

# For mongo01
config.vm.hostname = "mongo01"
config.vm.network :private_network, ip: "192.168.33.91"

# For mongo02
config.vm.hostname = "mongo02"
config.vm.network :private_network, ip: "192.168.33.92"

# For mongo03
config.vm.hostname = "mongo03"
config.vm.network :private_network, ip: "192.168.33.93"
Now go ahead and execute vagrant up inside each directory to create the VM. After this, execute vagrant ssh to access the VM.
Next, we need to make sure that each VM is accessible via DNS or hostname. In this case we are going to use the /etc/hosts file to set this up. Open the file on each VM and add the following lines:
# The IPs listed here must match the ones defined in the Vagrantfiles.

192.169.33.91    mongo01
192.169.33.92    mongo02
192.169.33.93    mongo03
Now you should be able to ping each VMs from one to another by using the hostnames.
MongoDB Replication Setup
Let’s install MongoDB on each VM.
sudo apt-get update
sudo apt-get install mongodb
Next, edit /etc/mongodb.conf. Remove the line bind_ip = 127.0.0.1 and add the following line:
replSet = repl01
# repl01 is the name of the replica set. You can change this name for something else.
Important: The name you choose for the replica name has to be the same in all the VMs, if not, you are going to get the following error when you try to add a new replica:
{
	"assertion" : "set name does not match the set name host repl01:27017 expects",
	"assertionCode" : 13145,
	"errmsg" : "db assertion failure",
	"ok" : 0
}
Note: Removing the bind_ip = 127.0.0.1 line allows incoming connections from all sources. Do not use this in production. Instead of removing this line, specify the IPs that are allowed to access this server.
Next, you have to restart the mongodb service to make the changes effective. For this run the following command on each VM:
sudo service mongodb restartAfter this you are almost done. Before continuing, check the connectivity between instances by making sure that each MongoDBinstance is reachable by the others. For this execute:
# In mongo01
mongo --host mongo02
mongo --host mongo03

# In mongo02
mongo --host mongo01
mongo --host mongo03

# In mongo03
mongo --host mongo01
mongo --host mongo02
You should be able to establish connection between servers.
Finally, execute the following command in the mongo shell in mongo01:
# Initiate replica set
use admin
rs.initiate()

# Verify the configuration
rs.conf()

# Add mongo02 as a member or the replica set
rs.add("mongo02:27017")

# Add mongo03 as a member or the replica set
rs.add("mongo03:27017")
You can check the status of the replica set by executing:
rs.status()The output of this should look like:
{
	"set" : "repl01",
	"date" : ISODate("2014-10-28T23:12:29Z"),
	"myState" : 1,
	"members" : [
		{
			"_id" : 0,
			"name" : "mongo01:27017",
			"health" : 1,
			"state" : 1,
			"stateStr" : "PRIMARY",
			"optime" : {
				"t" : 1414522392000,
				"i" : 1
			},
			"optimeDate" : ISODate("2014-10-28T18:53:12Z"),
			"self" : true
		},
		{
			"_id" : 1,
			"name" : "mongo02:27017",
			"health" : 1,
			"state" : 2,
			"stateStr" : "SECONDARY",
			"uptime" : 15754,
			"optime" : {
				"t" : 1414522392000,
				"i" : 1
			},
			"optimeDate" : ISODate("2014-10-28T18:53:12Z"),
			"lastHeartbeat" : ISODate("2014-10-28T23:12:29Z"),
			"pingMs" : 0
		},
		{
			"_id" : 2,
			"name" : "mongo03:27017",
			"health" : 1,
			"state" : 2,
			"stateStr" : "SECONDARY",
			"uptime" : 7953,
			"optime" : {
				"t" : 1414522392000,
				"i" : 1
			},
			"optimeDate" : ISODate("2014-10-28T18:53:12Z"),
			"lastHeartbeat" : ISODate("2014-10-28T23:12:27Z"),
			"pingMs" : 0
		}
	],
	"ok" : 1
}
The replica set is already setup. You should be able to create a database and a colletion in mongo01. You can verify that it gets replicated by opening the mongo shell in mongo02 or mongo03 and executing:
show dbsYou can only insert, modify or delete data in the primary member. If the primary member goes down, one of the secondary members will become primary.
Note: Mongo replica set requires an uneven number of members greater or equal than 3. If you have an even number of members then you must add an arbiter. The arbiter will be responsible for breaking the ties in the election of the primary member. You can find more information about this here.
I hope you find this useful.
Cheers.
I’ve been looking for a easy a simple explanation/tutorial of how to add cookies to a NSMutableURLRequest. After experimenting and reading a few forums and blogs, I finally understand how to do it and therefore, I decided to sumarized this in a way I would like someone to explain it to me.
There are two ways you can set cookies. The first one makes use of the setValue function of the NSMutableURLRequest instance. It basically requires you to create a string with the following format COOKIE_NAME_1=COOKIE_VALUE_1 and set it as a header. If you want to add multiple cookies, use a semicolon (;) to separate them. This is what your code would look like:
var request = NSMutableURLRequest(URL: NSURL(string: "http://example.com"))
request.setValue(
  "cookie_name_1=cookie_value1; cookie_name2=cookie_value_2",
  forHTTPHeaderField: "Cookie")
As you can see is very simple.
The second way seems a bit less simple but it does not involve creating a string with a specific format. In this case, each cookie is defined by a NSHTTPCookie instance. Here is a snippet of what the code would look like:
var request = NSMutableURLRequest(URL: NSURL(string: "http://example.com"))
// Cookie1 properties
var cookieProperties1 = [
  NSHTTPCookieOriginURL: "http://example.com",
  NSHTTPCookiePath: "/",
  NSHTTPCookieName: "cookie_name_1",
  NSHTTPCookieValue: "cookie_value1"]
// Create an instance of NSHTTPCookie for cookie1
var cookie1 = NSHTTPCookie.cookieWithProperties(cookieProperties1)

// Cookie2 properties
var cookieProperties2 = [
  NSHTTPCookieOriginURL: "http://example.com",
  NSHTTPCookiePath: "/",
  NSHTTPCookieName: "cookie_name_2",
  NSHTTPCookieValue: "cookie_value2"]
// Create an instance of NSHTTPCookie for cookie2
var cookie2 = NSHTTPCookie.cookieWithProperties(cookieProperties2)

// Create an array of cookies
var cookies[NSHTTPCookie] = [cookie1, cookie2]

// Create cookies as headers
var cookieHeaders = NSHTTPCookie.requestHeaderFieldsWithCookies(httpCookies)

// Set cookies as part of the request header
request.allHTTPHeaderFields = cookieHeaders
The first thing you do is to create a dictionary that contains the cookie properties. Once you have that, you create an instance of NSHTTPCookie by calling the cookieWithProperties function and passing the properties dictionary. Repeat this process for each cookie you want to set and append it to an array. Once you are done, use the requestHeaderFieldsWithCookies function to create the cookie headers. Last, assign the cookie headers to the request by using the allHTTPHeaderFields attribute.
NOTE: Assigning the cookies using allHTTPHeaderFields function, will override the previous headers you may have set using the addValue function. If you want to set headers to the request, do it after you set cookies if you are using the second way.
I hope you find this useful. Cheers.
If you are trying to create a NSHTTPCookie using the cookieWithProperties function and getting back nil instead of a NSHTTPCookie instance, the dictionary that you are passing to the function must be wrong or incomplete.
// Wrong properties dictionary
var properties = [NSHTTPCookieName: "YOUR-COOKIE-NAME", NSHTTPCookieValue: "Cookie Value"]

// nil cookie
var cookie = NSHTTPCookie.cookieWithProperties(wrongProperties)
After executing this code, the cookie will be nil. This occurs because the properties dictionary does not contain the right keys and values. The documentation of the function cookieWithProperties says: “To successfully create a cookie, you must provide values for (at least) the NSHTTPCookiePath, NSHTTPCookieName, and NSHTTPCookieValue keys, and either the NSHTTPCookieOriginURL key or the NSHTTPCookieDomain key.”.
Following exactly what I just quoted, our code will look like this:
var properties = [
    NSHTTPCookieOriginURL: "http://example.com",
    NSHTTPCookiePath: "/",
    NSHTTPCookieName: "foo",
    NSHTTPCookieValue: "bar"
]

var cookie = NSHTTPCookie.cookieWithProperties(properties)
The execution of the code above will end up with the cookie being an instance of NSHTTPCookie.
Cheers.
Read-Eval-Print-Loop - REPL. is an interactive environment for computer programming.
Being used to languages like Python, REPL is a powerful tool that you use on a daily basis for experimental purposes, exploring functions and algorithms, debugging and even for learning a new programming language.
Using Swift REPL
First you need to have Xcode6 installed. Then, execute the following command in the terminal:
sudo xcode-select -s /Applications/Xcode6-Beta.app/Contents/Developer/Once you have executed the command above, you are ready to start. Go ahead and execute:
xcrun swiftThis is going to start a Swift interactive console. Next, type:
1> 1 + 1
$R0: Int = 2 // This is the result of the operation
You can declare variables, functions, classes, etc. You may want to import Foundation depending on what you want/need to use. i.e.:
1> var url = NSURL(string: "http://blog.hjoseph.com")
:1:11: error: use of unresolved identifier 'NSURL'
var url = NSURL(string: "http://blog.hjoseph.com")
As you can see you get back an error telling you that it doesn’t recognize NSURL. If you import Foundation you don’t get this error anymore.
1> import Foundation
2> var url = NSURL(string: "http://blog.hjoseph.com")
url: NSURL = "http://blog.hjoseph.com"
You can also run your Swift scripts by executing the following command:
xcrun swift -i YOUR_FILE.swiftYou can even make the file executable by adding the following line at the begining of the file:
#!/usr/bin/env xcrun swift -iThen, change the file mode to executable.
chmod +x YOUR_FILE.swiftNow, you can run your file by executing:
./YOUR_FILE.swiftCheers!
I tend to be the kind of developer that likes to start from scratch and understand from the bottom up everything I’m doing and how I can hack it. This is the reason why I decided to start an empty project with no storyboard or anything pre-defined. Using a storyboard may be easier at the beginng but probably, in my opinion, this level of abstraction just makes things a bit too messy when you have a big project with multiple developers involved. I also feel that writing and having the whole application flow in my code is that right way to do stuff and definitely a better way to debug when things are not working the way you expected.
Creating an Empty Project
Assuming that you are using Xcode6 (I’m using the Beta2).
File > New > Project
Once the Project dialog Poped-up you should see something like this:
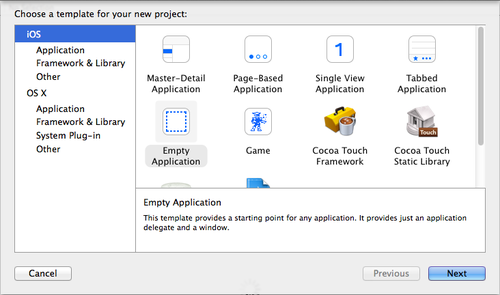
Now, go ahead and select from the left menu, Application under the iOS option. Next, select Empty Application and hit Next. Then we have to name the product, in this case let’s call it HelloWorld. Also, in the Language dropdown select Swift.

Finally, hit Next and select the location where you want to store the project.
You should have a project that looks like this:

Creating a View
Now, let’s create a view.
File > New > File
Next, from the left menu on the template dialog select User Interface under iOS. Then select View and hit Next.

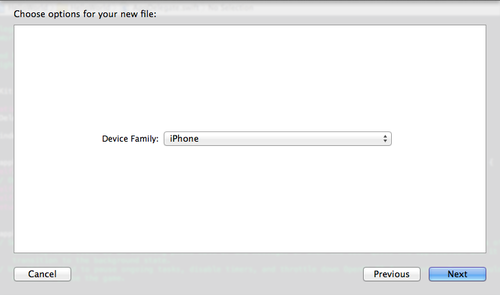
After this select the Device Family (iPhone in my case) and hit Next.
Finally, name the file RootView and select its location. Make sure to place the file inside the HelloWorld folder in your project. Hit Create and you’ll see a new file called RootView.xib.
Now, let’s add a label to the view. First, select the RootView from your project tree. You should see the Interface Builder XIB Document open.
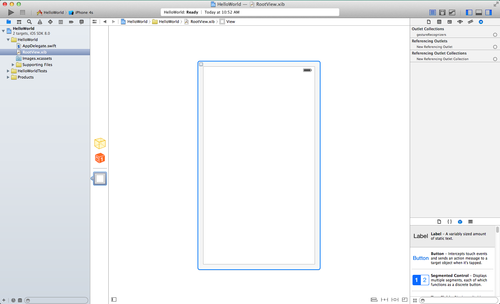
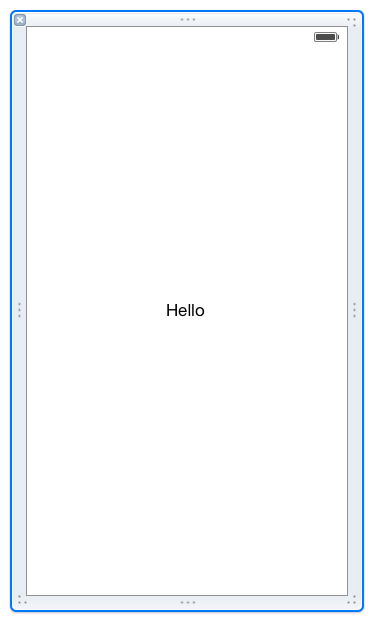
Next, drag a label from the right bottom side and drop it in the midle of the view. Then double click the label to change to “edit mode” and type “Hello”. You should have something like this:
Creating a View Controller
Now let’s create the view controller that is going to be in charge of the actual view.
File > New > File
Next from the left menu on the template dialog select Source under iOS.

Then select Swift File and hit Create.
Now, let’s write the following code on this file:
import UIKit


class RootViewController: UIViewController {

}
As you can see, we are defining a class called RootViewController that inherits from UIViewController. Our class is empty. Here, you can add functions and attributes that can be connected to elements on the view.
Connecting The View With The View Controller
Now that we have the view and the controller defined, we need to create the connection between them so the view identifies its controller. For this we have to follow these steps:
- Click on the RootView.xib file.
- Once the file is open, click on the File’s owner icon (the yellow 3d-box).
- Select the thrid tab on the inspector menu.
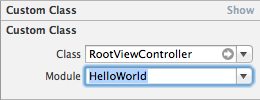
- Set the Custom Class - Class to RootViewController and the Custom Class - Module to HelloWorld.
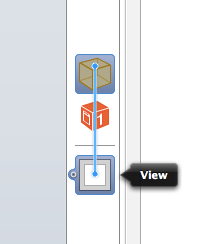
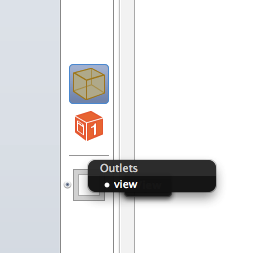
- Control-click (right-click) the File’s Owner icon and drag it to the View icon. This will define the view as an outlet of the File’s Owner.
Defining a Navigation Controller
Lastly, we need to do some work in the AppDelegate.swift file. First, let’s add a UINavigationController attribute to the AppDelegate class. Add the following code after the var window: UIWindow? declaration.
var navigatorController: UINavigationController?Next, right before the return true instruction of the func application add the following code:
var rootViewController = RootViewController(nibName: "RootView", bundle: nil)
self.navigatorController = UINavigationController(rootViewController: rootViewController)
self.window!.rootViewController = self.navigatorController
The code above creates an instance of RootViewController specifying the RootView.xib as its nib. Next, it initializes the navigationController setting the instance of RoowViewController as the rootViewController. Finally, it sets the navigatorController as the rootViewController of the AppDelegate window.
We are done. Now you should be able to hit run and see the app in the iOS Simulator.

Stay tuned for more!
Firstable stop the VM. Then execute:
cd <PATH_TO_VIRTUALBOX_VMs>/<YOUR_VM>
VBoxManage clonehd --format VDI <YOUR_VM_DISK>.vmdk <NEW_VM_DISK_NAME>.vdi
VBoxManage modifyhd <NEW_VM_DISK_NAME>.vdi --resize 60000
This can only be used to expand (not shrink) the capacity.
Once you have done this, open VirtualBox, right-click on your VM and select Settings. Once the Settings window is open go to the Storage section, click on “Add new IDE controller” and select the new VM_Disk file. Then select the previous disk and remove it from the attachment. Click ok and restart the VM.
I’ve been working, experimenting and playing for a while with different ways to extract information from text documents. One of the most important task is determining the terms (keywords) that define a text document. This task is the based of full text search, indexing and many other applications.
Determining the terms from a text can be very simple, but it can also get really complicated. All this depends on the final application. These are the basic steps to get the keywords:
- Remove all the punctuation signs.
- Strip all the simple/stop words. You can find lists of these online, but you can also create your own depending on the final results and the context of the text.
- The remaining words are going to be consider terms. Split the text by spaces and count how many times each term appears and divide that number by the total number of terms. This would be the a frequency factor that you can use to rank the term in that document.
It’s important to mention that not always the term with higher frequency factor is the one that best defines the document. Sometimes it’s better to use the inverse value or the IDF (Inverse Document frequency value). You can read more about this here.
Cheers.